How to Sign Up for Binance (Registration Through KYC, Step by Step)
Every step from creating your Binance account to passing KYC, screenshotted tap by tap as I went through it.

Everything you need to get a Binance account open and verified (KYC), start to finish. I screenshotted every single tap along the way, so the step count looks intimidating — but sit down and actually do it and you're out in 10 to 15 minutes. Anything Binance has changed since has been updated here.
One thing before you start: Binance runs a new-user promo worth up to 19,800USD in bonuses plus a trading fee discount(https://rewardoc.com/exchange/binance/). Don't just sign up cold — check the event page first. (You can't claim it after the account exists.)
When you sign up, skip the sponsored ad at the top of search results and use the official link. Phishing sites buy the top ad slot from time to time. This has actually happened. (Coverage: Fake Hyperliquid Google ads used for phishing...)
This is a referral code that gets you 20% off Binance fees plus a signup bonus. Any code works, but the perks attached to each one are completely different. (Worth checking Binance referral codes and signup bonuses before you commit.)
Before you sign up
Don't just punch in an email, half-type your name, and barrel ahead. That's how you end up in support ticket hell later. Sort these three things out first.
- Use the exact name on your passport, everywhere.
Later on, when you transfer coins in from another exchange, the sending and receiving names have to match. One character off and the transfer gets blocked. Travel Rule compliance runs that name check automatically, and when it trips, your coins sit in limbo. Pull up whatever exchange you'll be sending from, check the name on file there, and enter the identical thing on Binance.
One account per person. That's it.
You cannot open a second account with the same ID document. If you vaguely remember making an account years ago, recovering it is faster than fighting the system for a new one. Duplicate accounts tend to surface at the withdrawal stage, which is the worst possible time to find out. Just don't create one.
Good lighting, ID in hand, before you begin.
The ID photo and face scan are where people get stuck. Sounds trivial, but fail it a couple of times and keep resubmitting and you get kicked to manual review, which can eat hours. Have your ID out on the desk before you start so the session doesn't time out mid-flow.
1. Creating your Binance account
1-2. Getting to the signup page
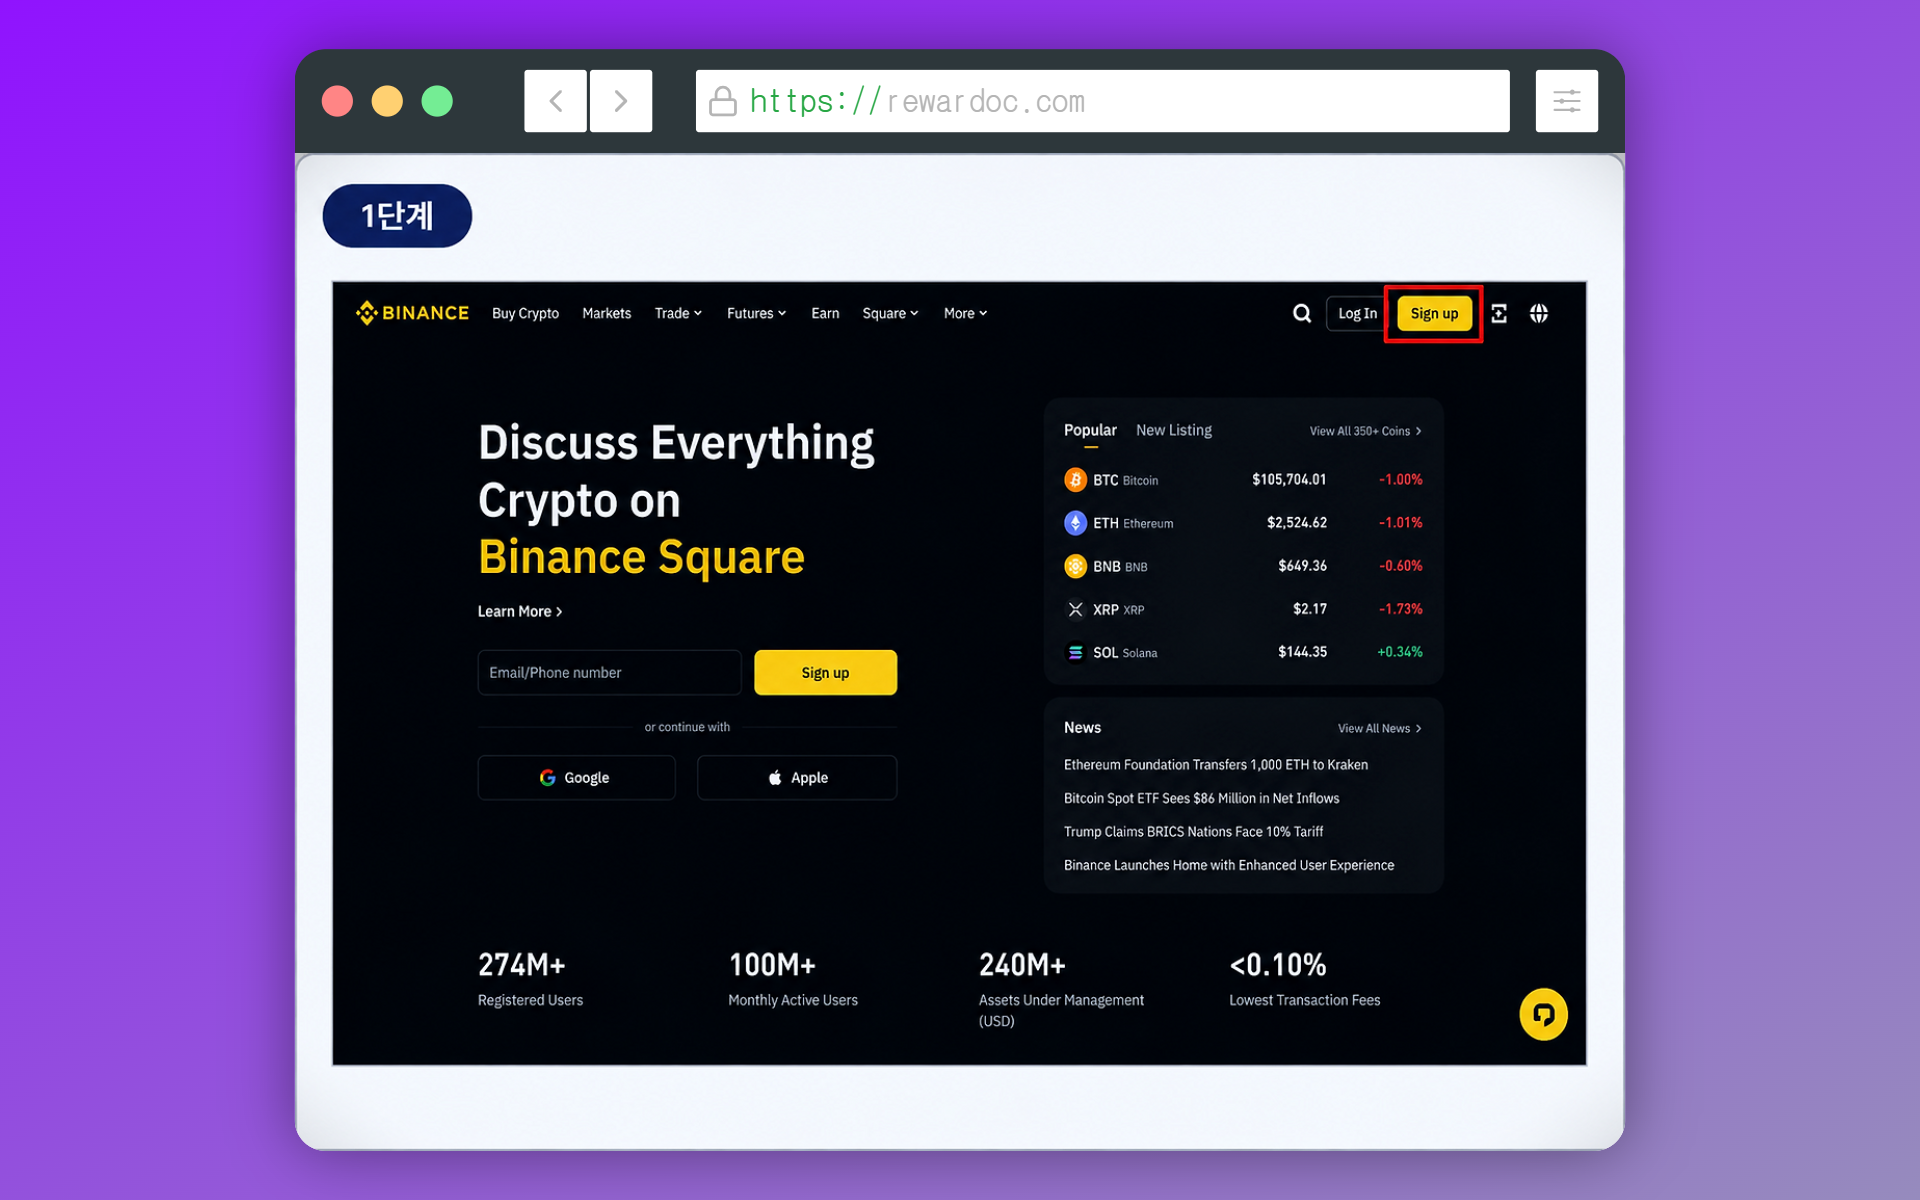
Hit 'Sign up' in the top right and you land on the registration screen.
Open Binance. If you have a referral code, use it. Depending on your volume, the fee difference runs from a few hundred to a few thousand dollars. And the fee discount is only half of it — the signup bonuses vary wildly between codes too. (If you don't know which code to use, pick one from the [Binance signup bonuses & referral codes] page.
[Binance signup bonus link: https://www.binance.com/en/events/event700]
Come in through a referral link and you'll see the 20% fee discount and bonus details laid out on the left side of the screen on desktop.
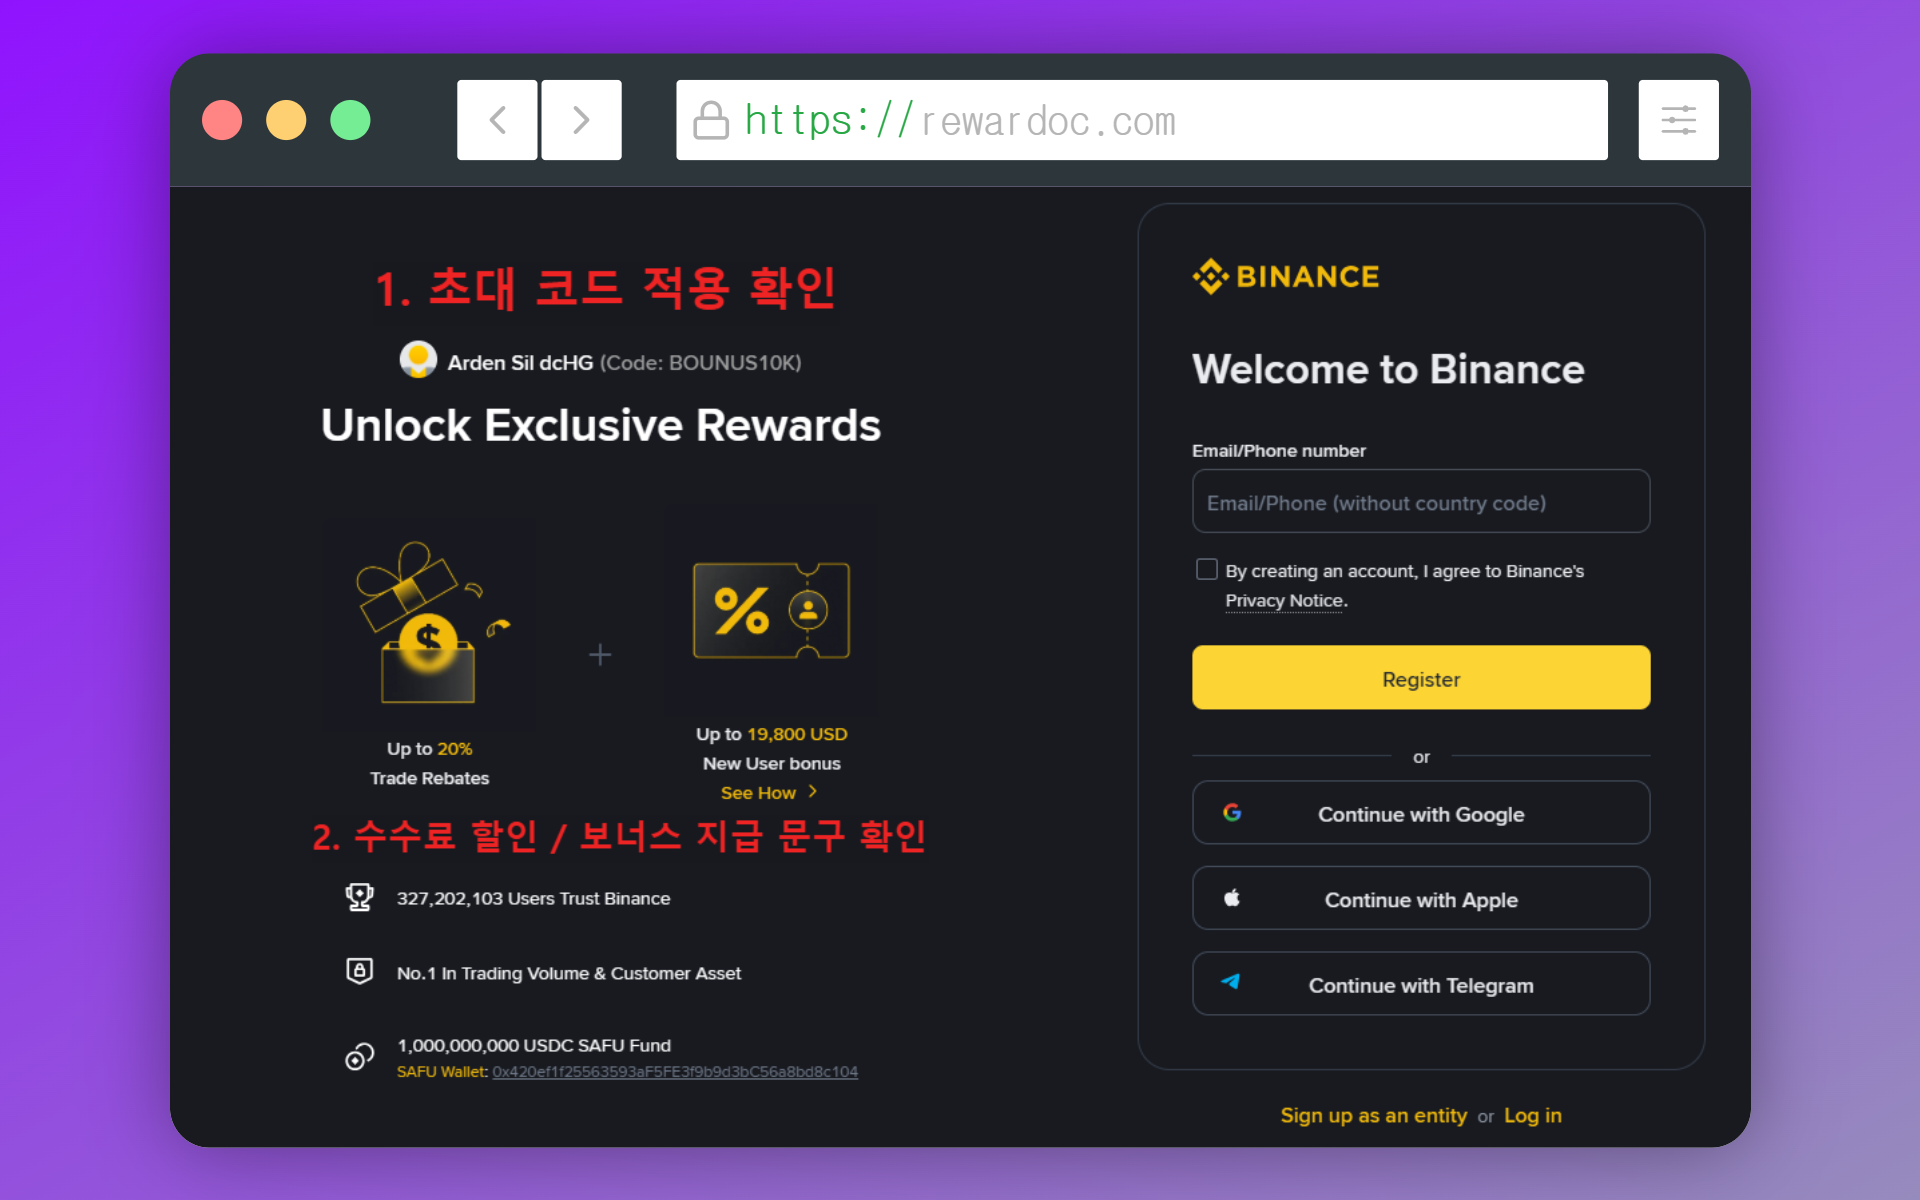
If it says 0% there, or the code field is blank, the link didn't carry through. Close the app or browser completely and start again from step 1. You can also land on a page where a code is filled in but the discount still reads 0% — any referrer works, but the fee discount attached to each code is different.
Like I said: a referral code affects both your fee rate and the event bonuses you collect while trading. And you cannot add one after the fact. There's no way to attach a code once the account exists, so verify it on this screen before you move on.
1-3. Signing up with email
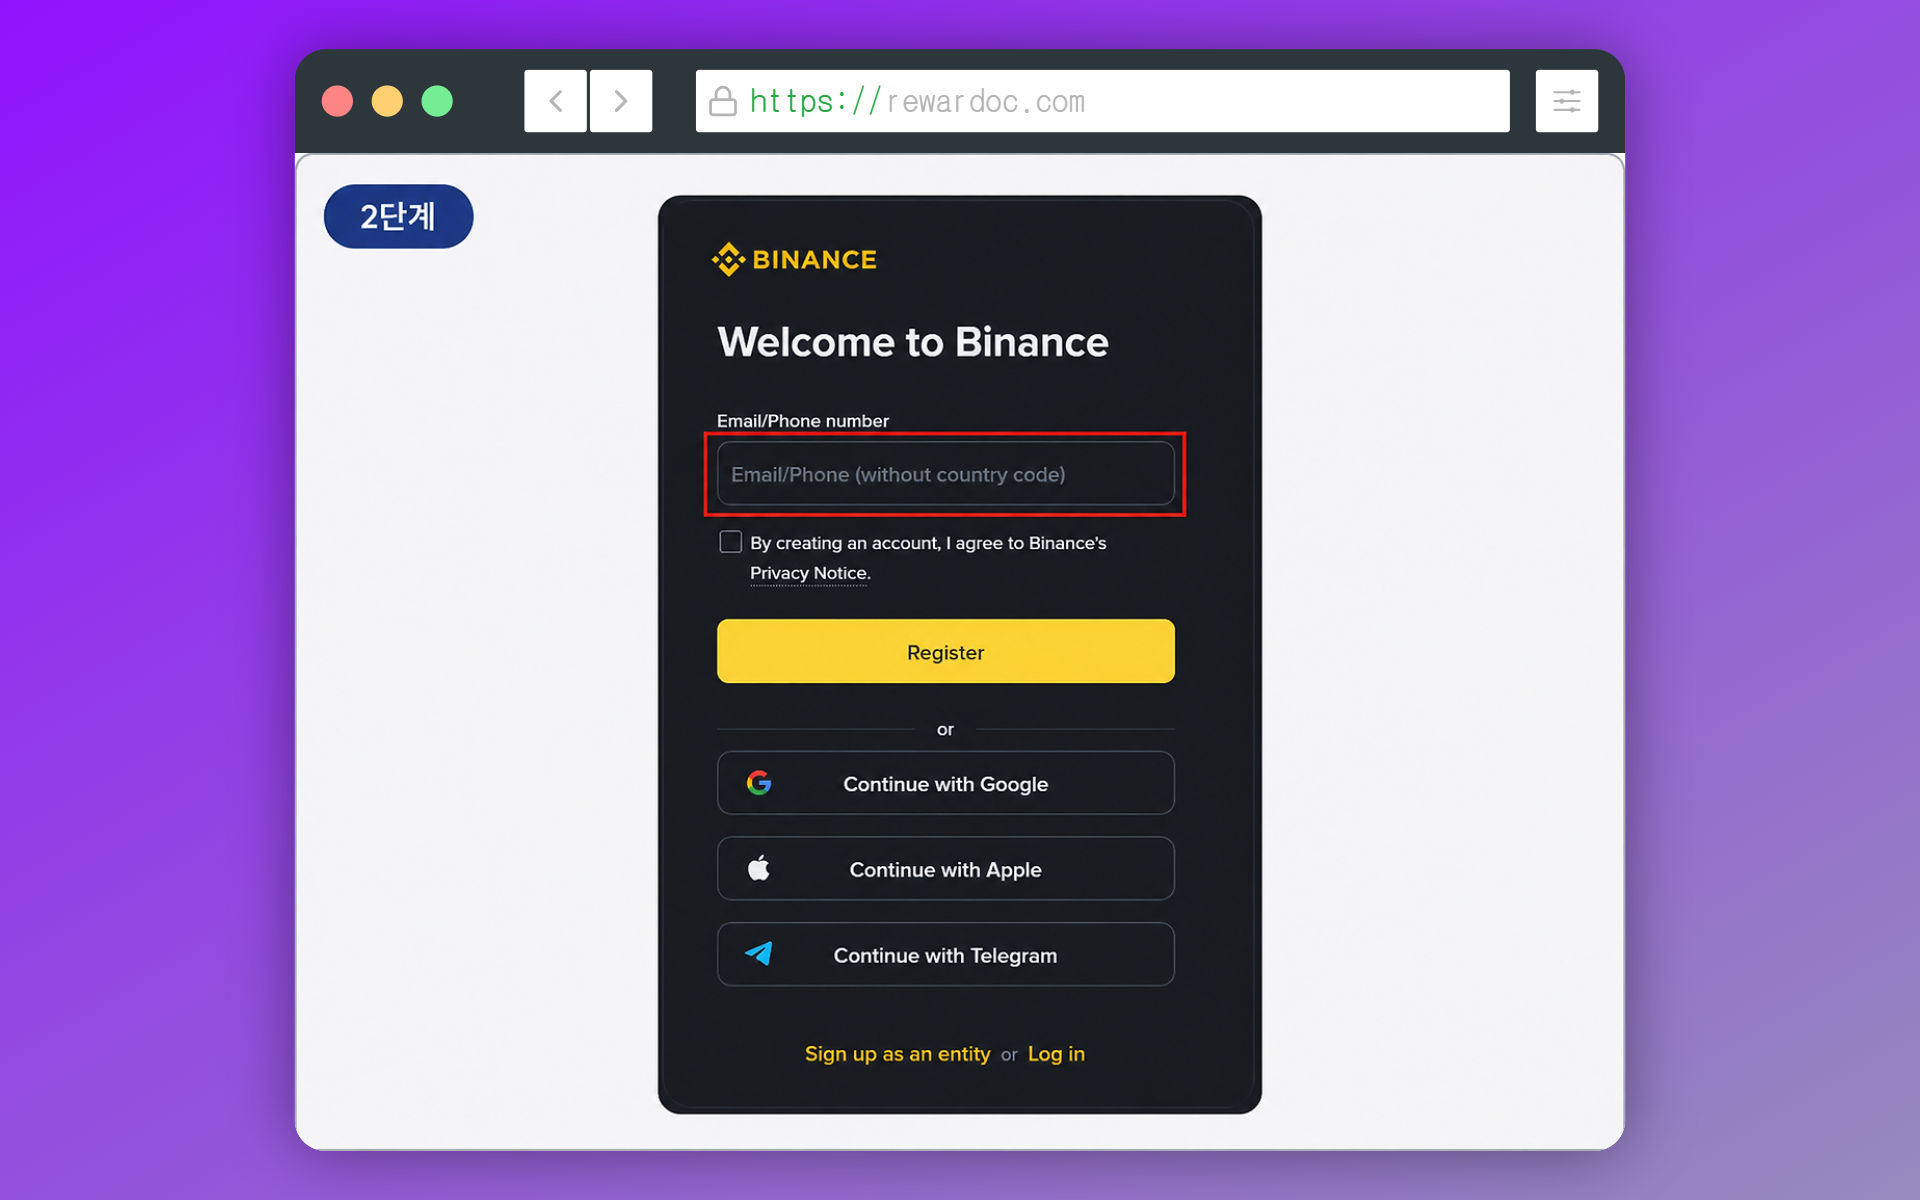
You can register with email or phone number. Go with email. If you swap phones or change numbers down the line, recovery is far less painful. Use your regular address or a fresh one made just for exchanges. Enter it and hit [Next].
Avoid social logins — Google, Apple, all of them — if you can. If that social account gets frozen or lost, recovering your exchange account becomes a nightmare. Keep them separate so that losing one doesn't lock you out of the other.
Personally, I keep a dedicated email just for exchange accounts. A fresh address you don't use anywhere else is simply better security. If you do make a new one, turn on notifications. That way you catch a compromise fast.
1-4. Entering the verification code
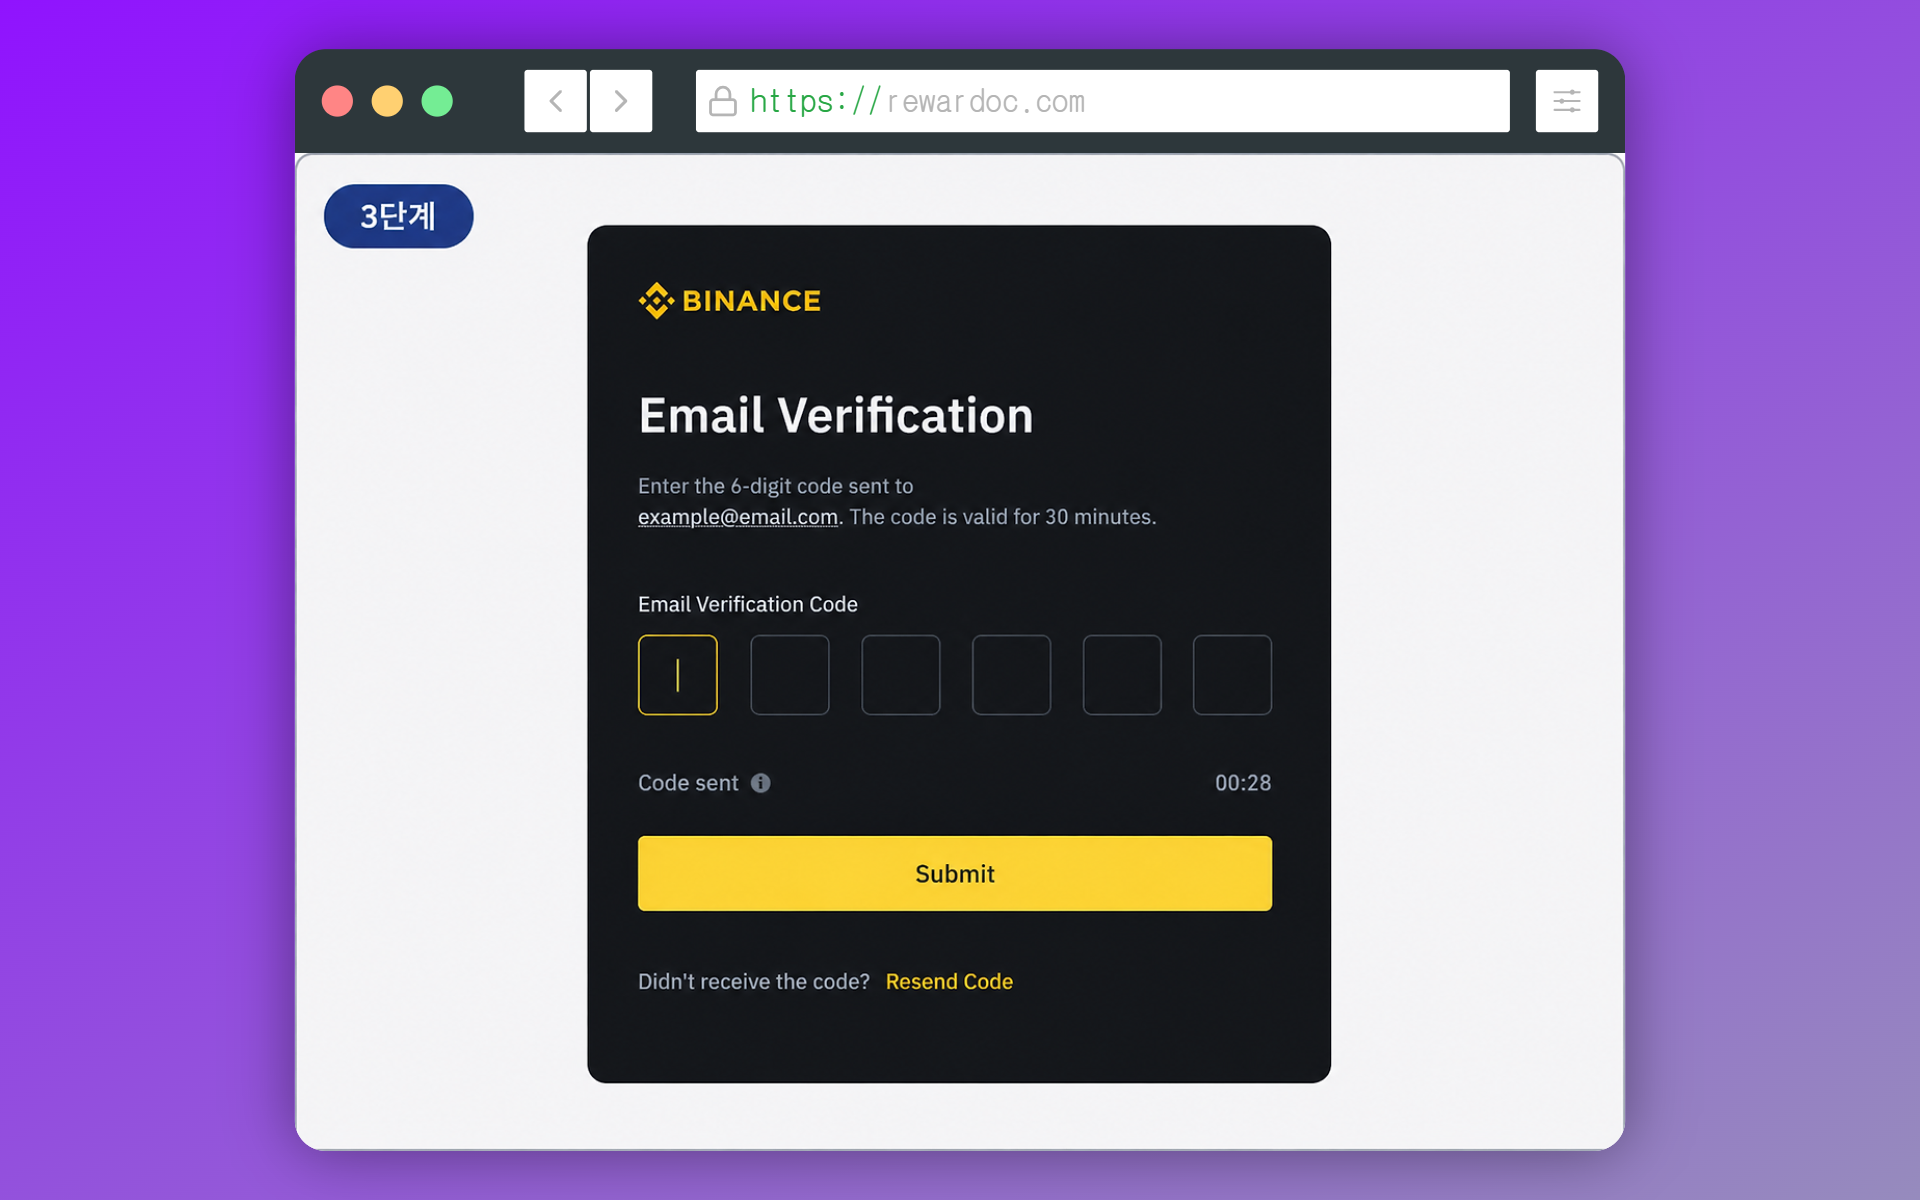
A 6-digit code hits your inbox. It expires quickly, so grab it right away. Nothing there? Check spam. New email accounts routinely dump their first incoming message into the spam folder.
1-5. Setting a password
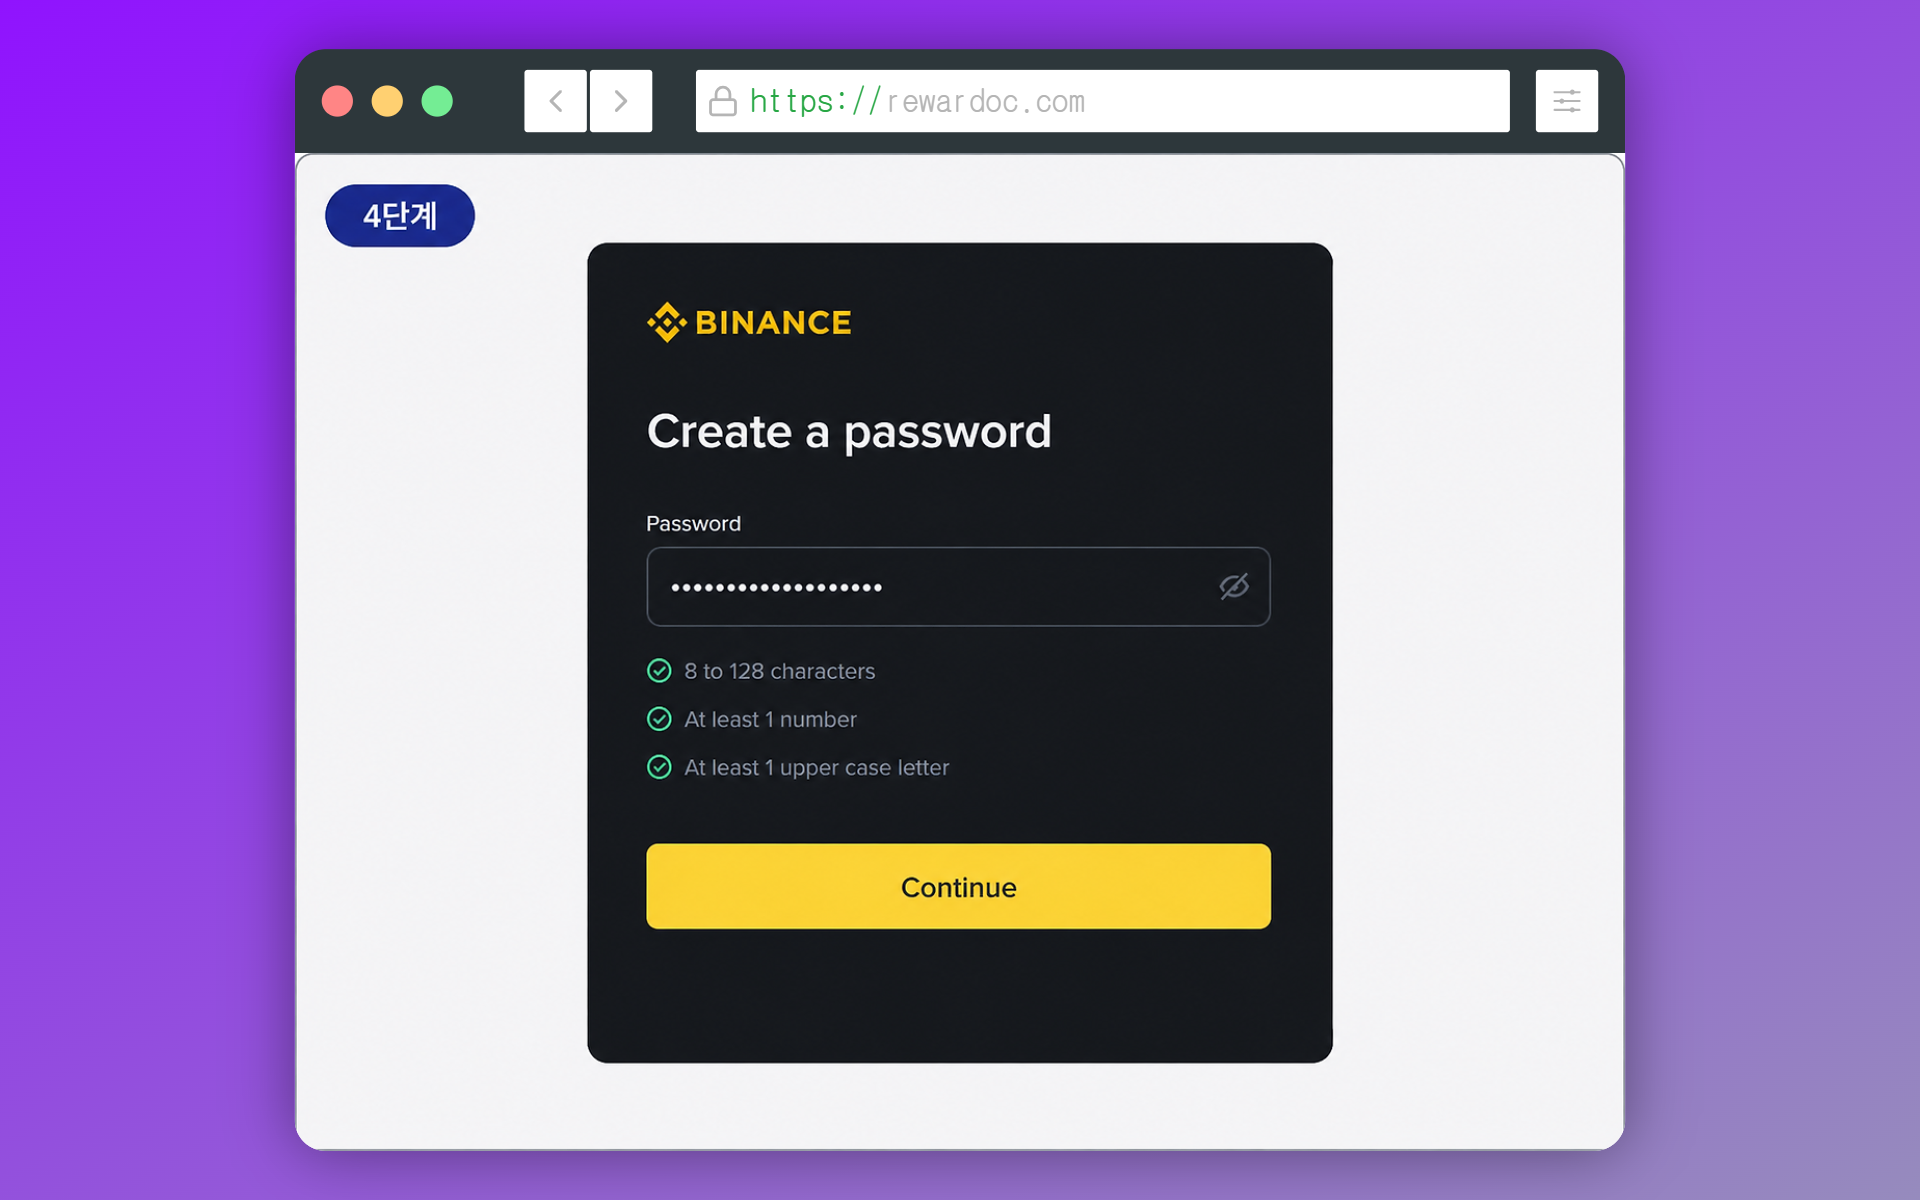
Eight characters minimum, mixing uppercase, lowercase, numbers, and symbols. Don't recycle a password from another site. Exchange accounts don't come with a guaranteed 100% recovery if they get drained. Credential stuffing — running leaked password lists against exchange logins — is one of the most common attacks out there.
1-6. Confirming the account
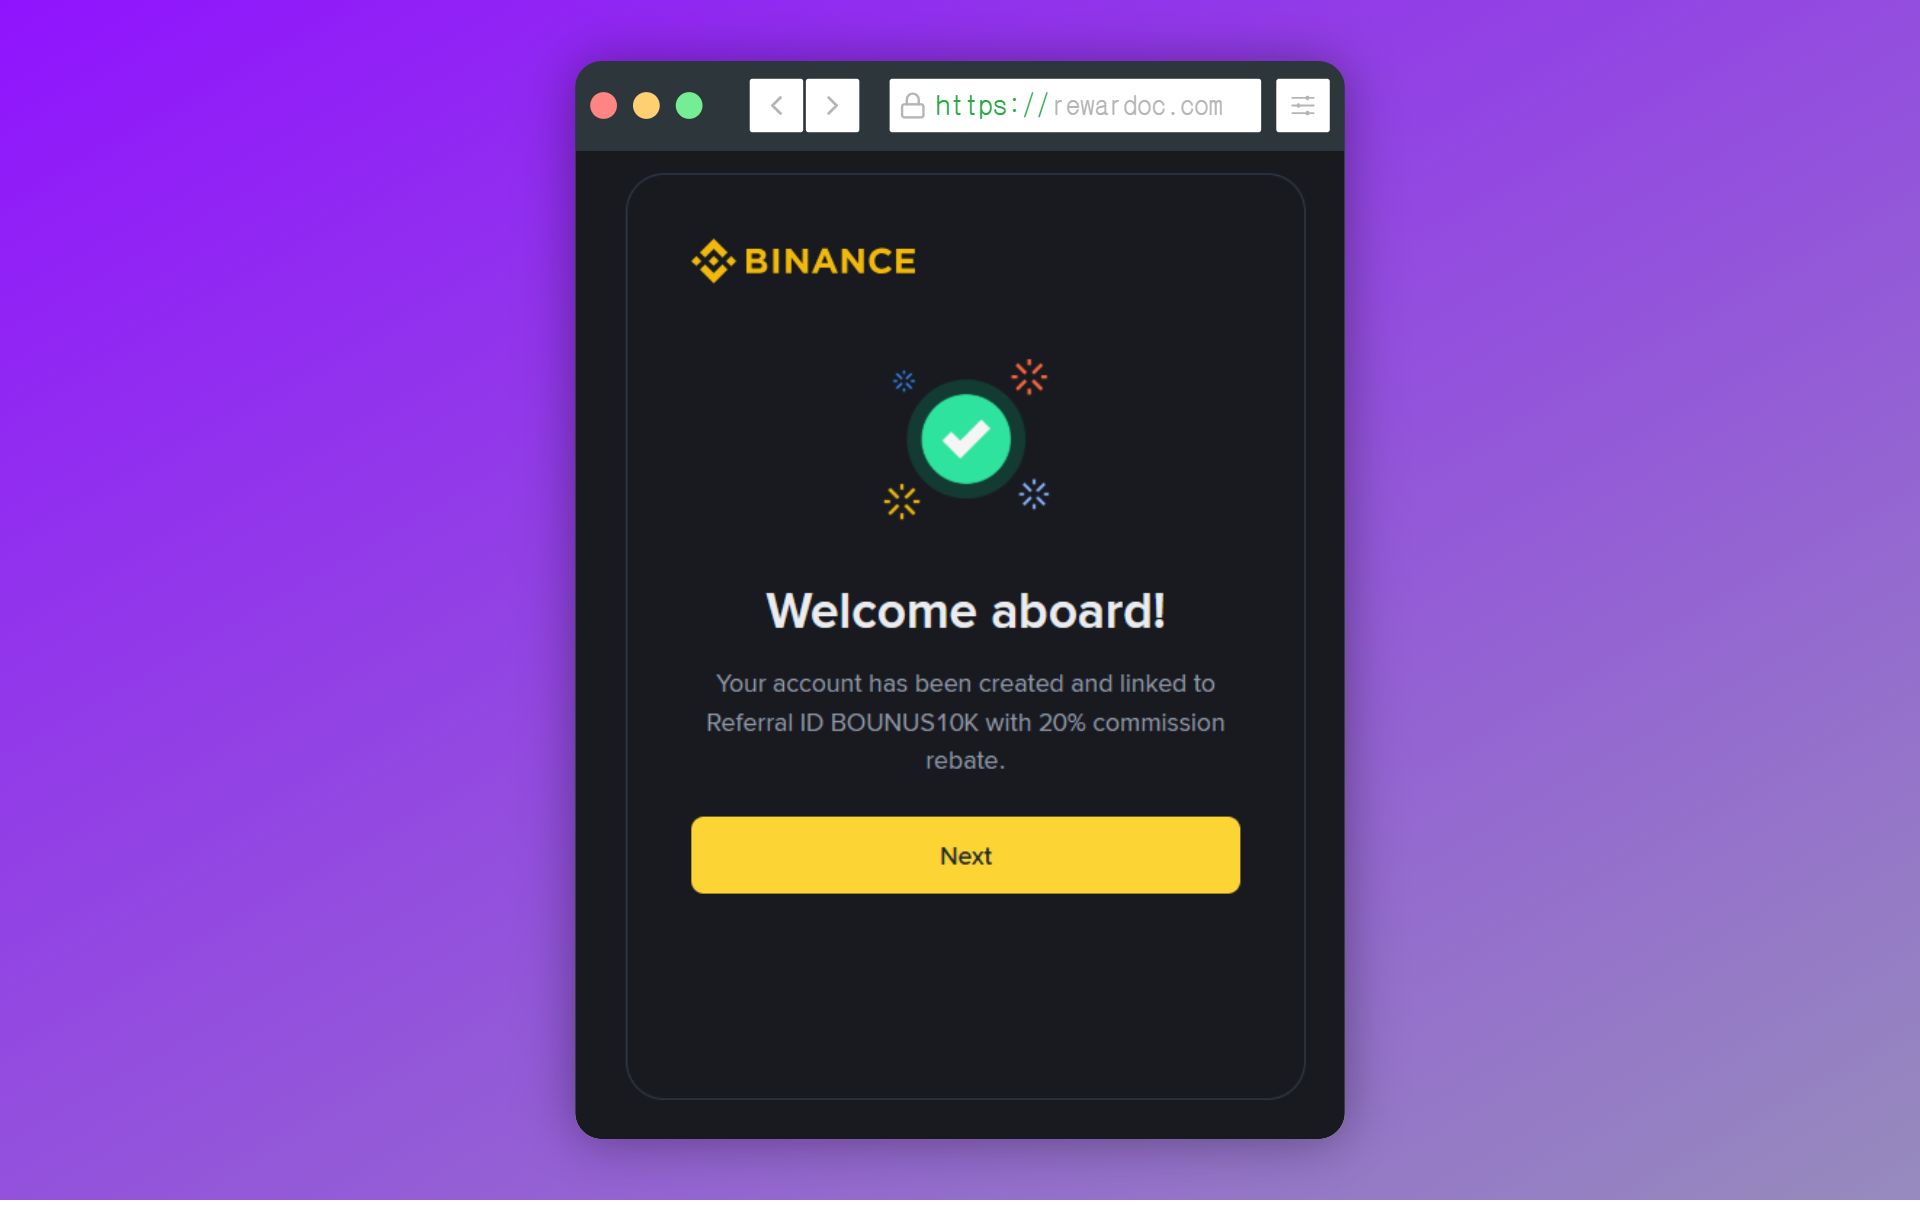
You'll get a completion screen, with your fee discount confirmed on it. The signup itself is done here — but verification is next.
1-7. Installing the app and logging in
If you registered on desktop, search "Binance" on the Play Store or App Store and install it. A handful of apps with similar names usually show up, so check the developer name and download count before you tap install. Phishing apps and phishing links are a real problem. Safest move is to go straight through the links below.
Reference links:
Binance app — Google Play Store
Once installed, log in with the email and password you just set. Since it's a new device, Binance may ask for an email code one more time.
2. Binance identity verification (KYC)
2-2. Opening the verification screen
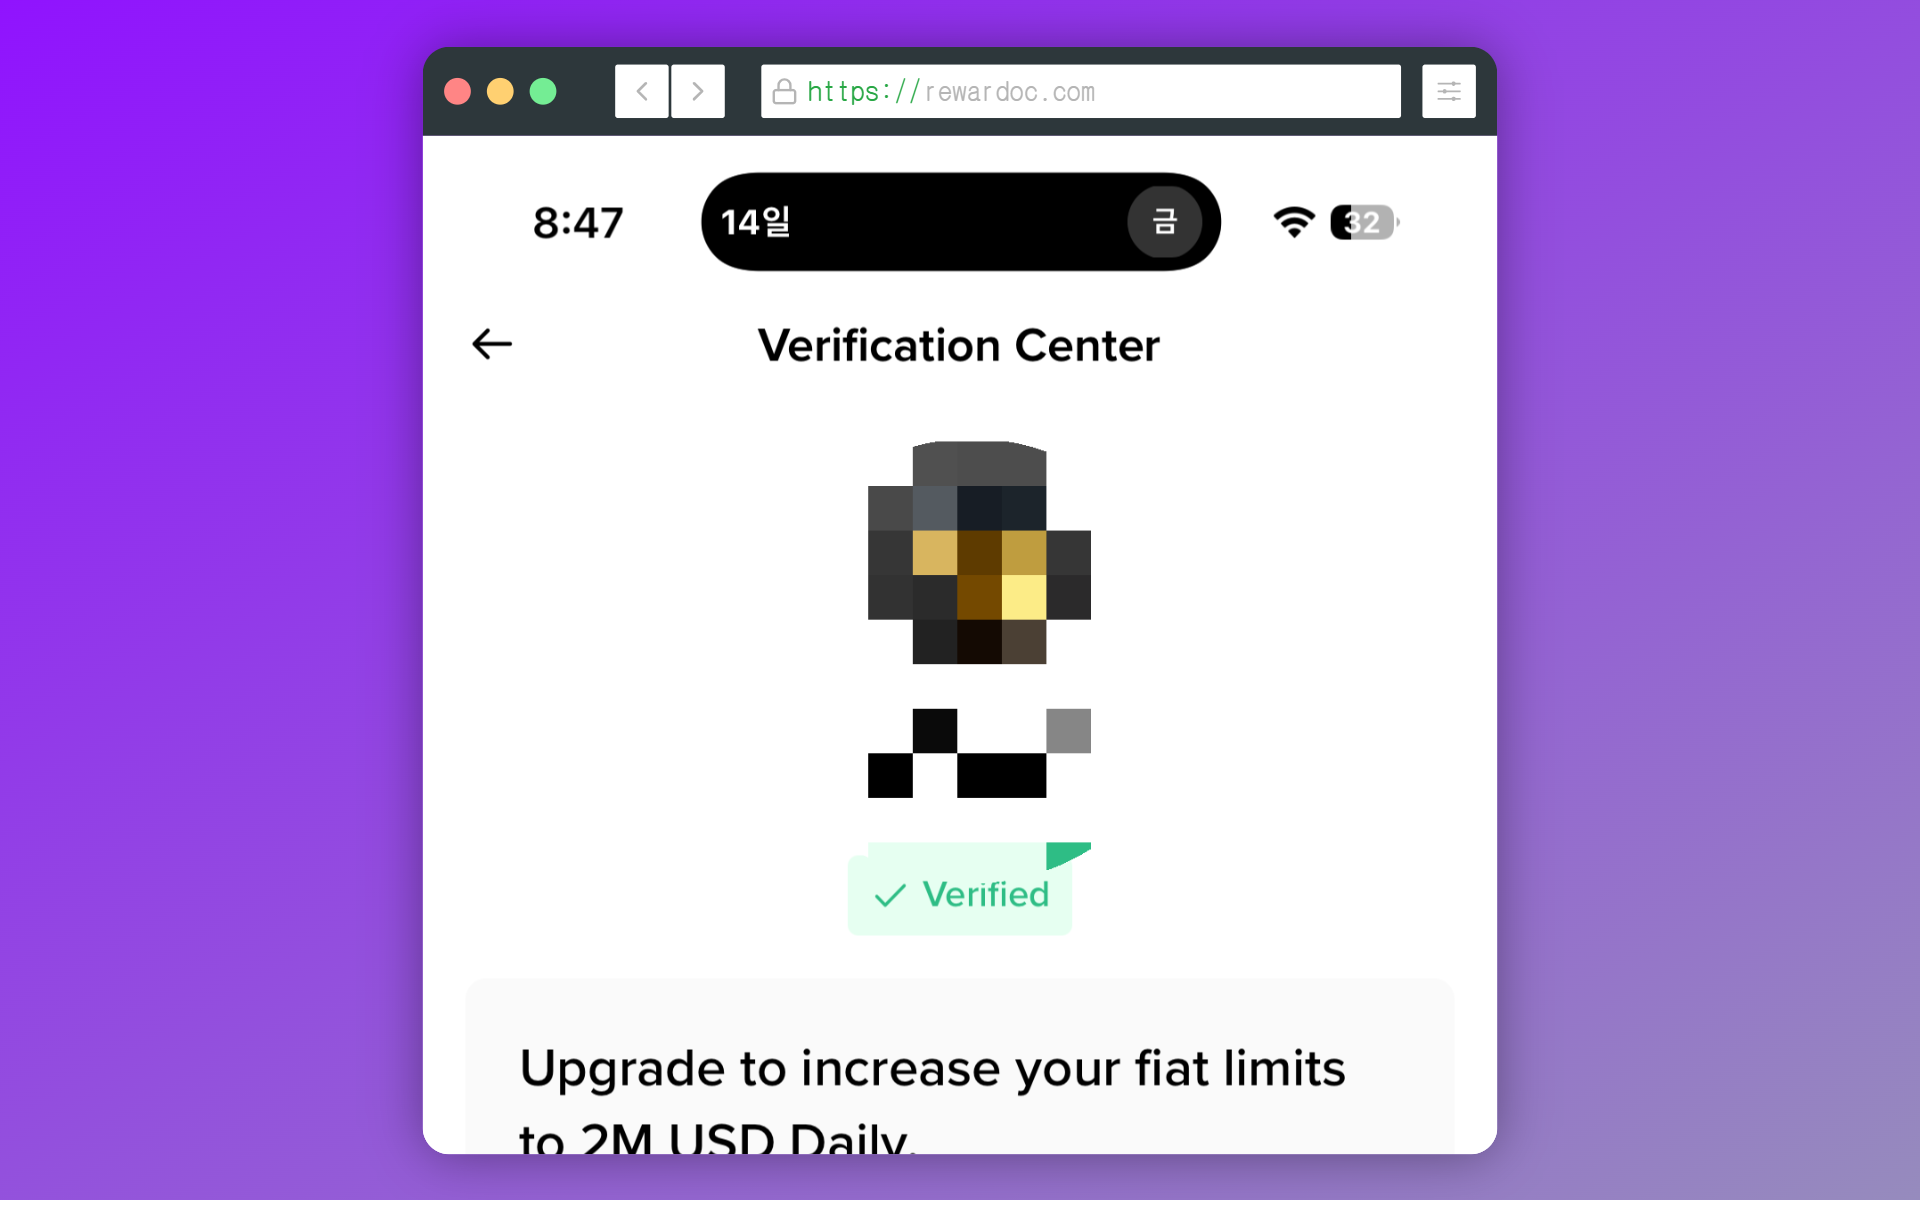
(Mine already shows 'Verified' since I finished this a while back. Just follow the order below.)
With the account created, it's time for KYC. This is how the exchange confirms you are who you say you are, and without it you can't trade, deposit, or withdraw. It isn't an optional step — it's the minimum requirement for the account to function at all.
Normally the verification prompt appears automatically right after you log in. If it doesn't, tap the profile icon in the top left and go into the verification menu.
2-3. Choosing your residence and document issuing country
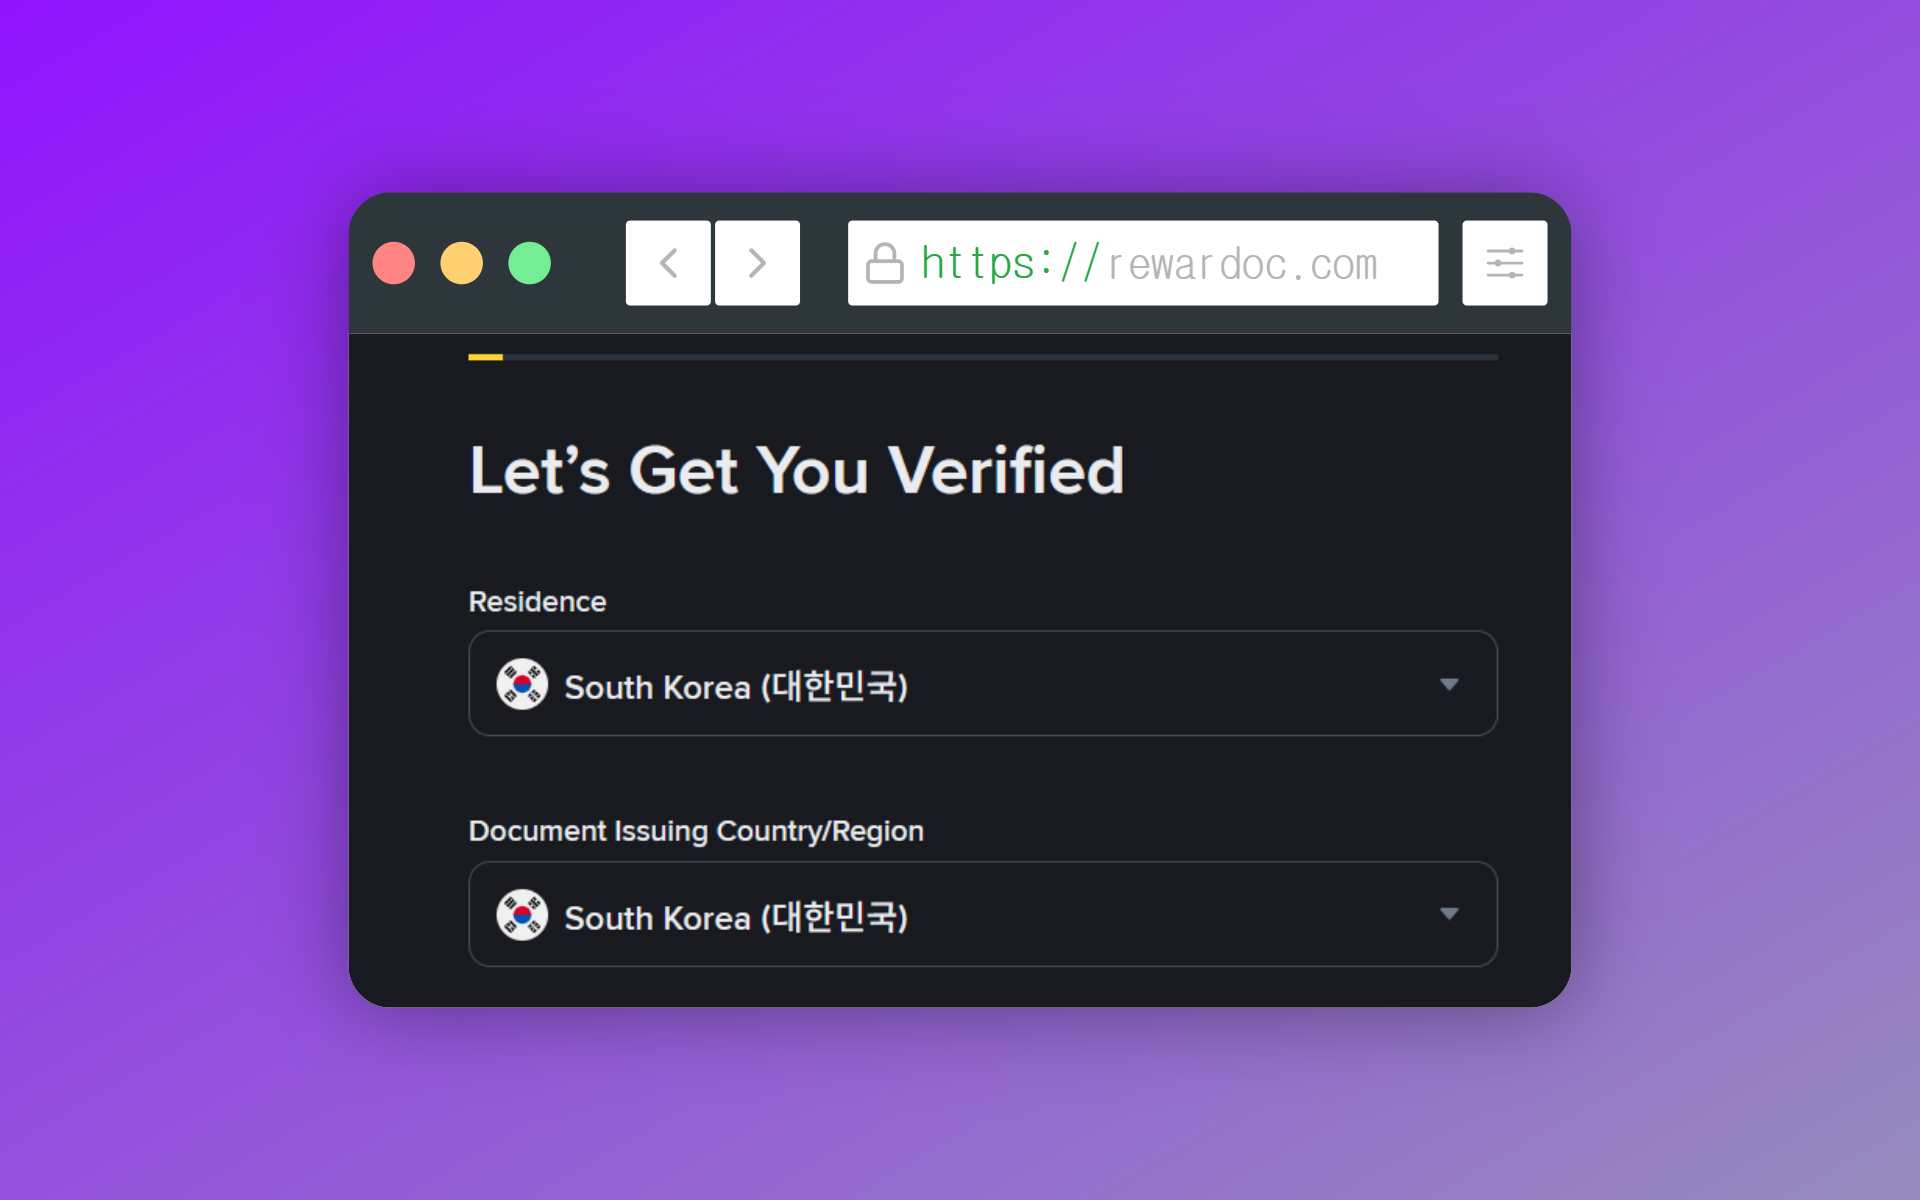
'Residence' is where you live. 'Document Issuing Country/Region' is where your ID was issued. Confirm both are correct and hit [Continue]. The country you pick determines which documents Binance asks for and which features you get, so don't select somewhere you don't actually live. Changing it later means resubmitting documents, which is a hassle.
2-4. Picking your document type
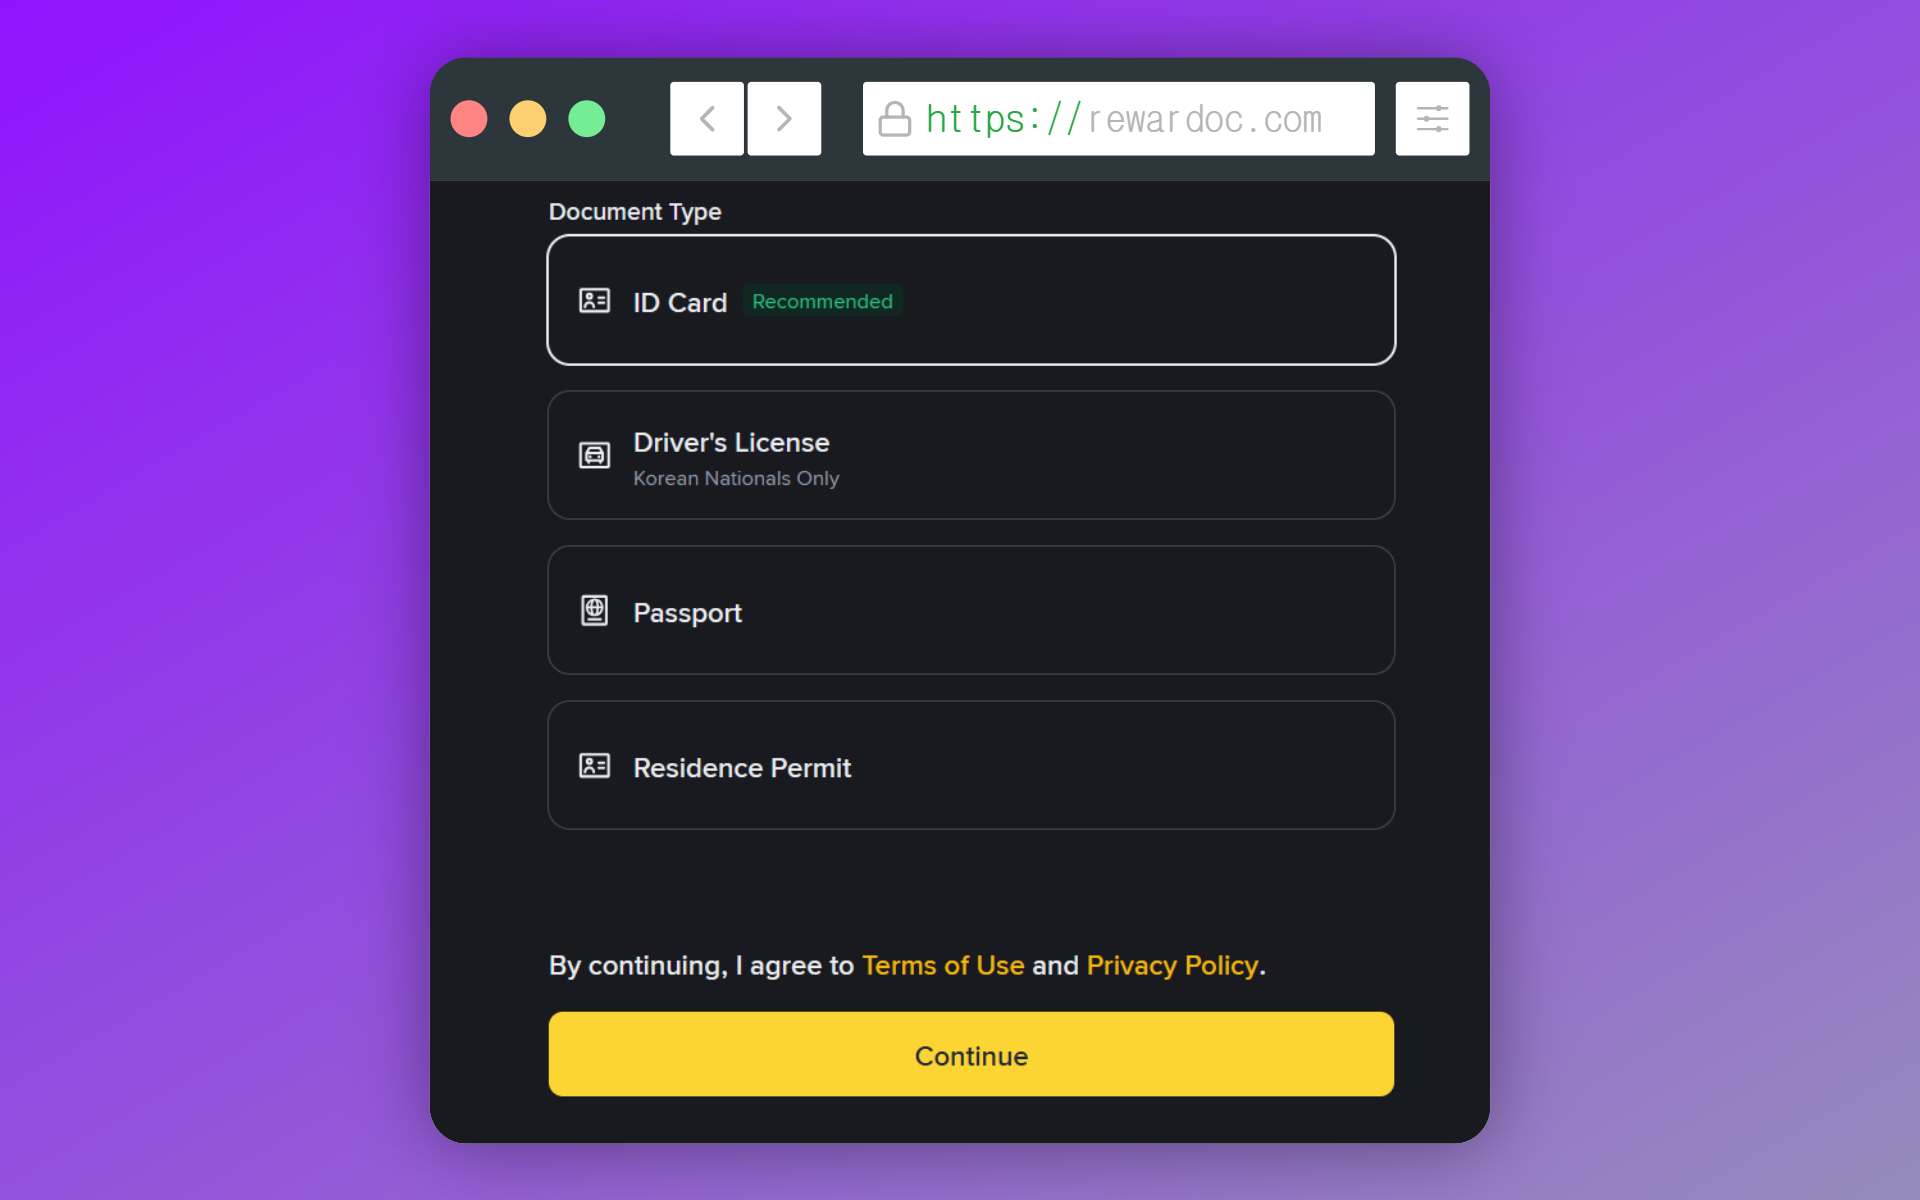
Right below the country fields is where you choose which document to use.
National ID card, driver's license, or passport. If you have a passport, use it. The name goes in exactly as printed, so matching it against your other exchange accounts later is straightforward. A driver's license works fine too.
If your document isn't printed in Latin characters, on the other hand, the system has less to match your name against and your rejection odds tick up.
2-5. Choosing how to capture the photos
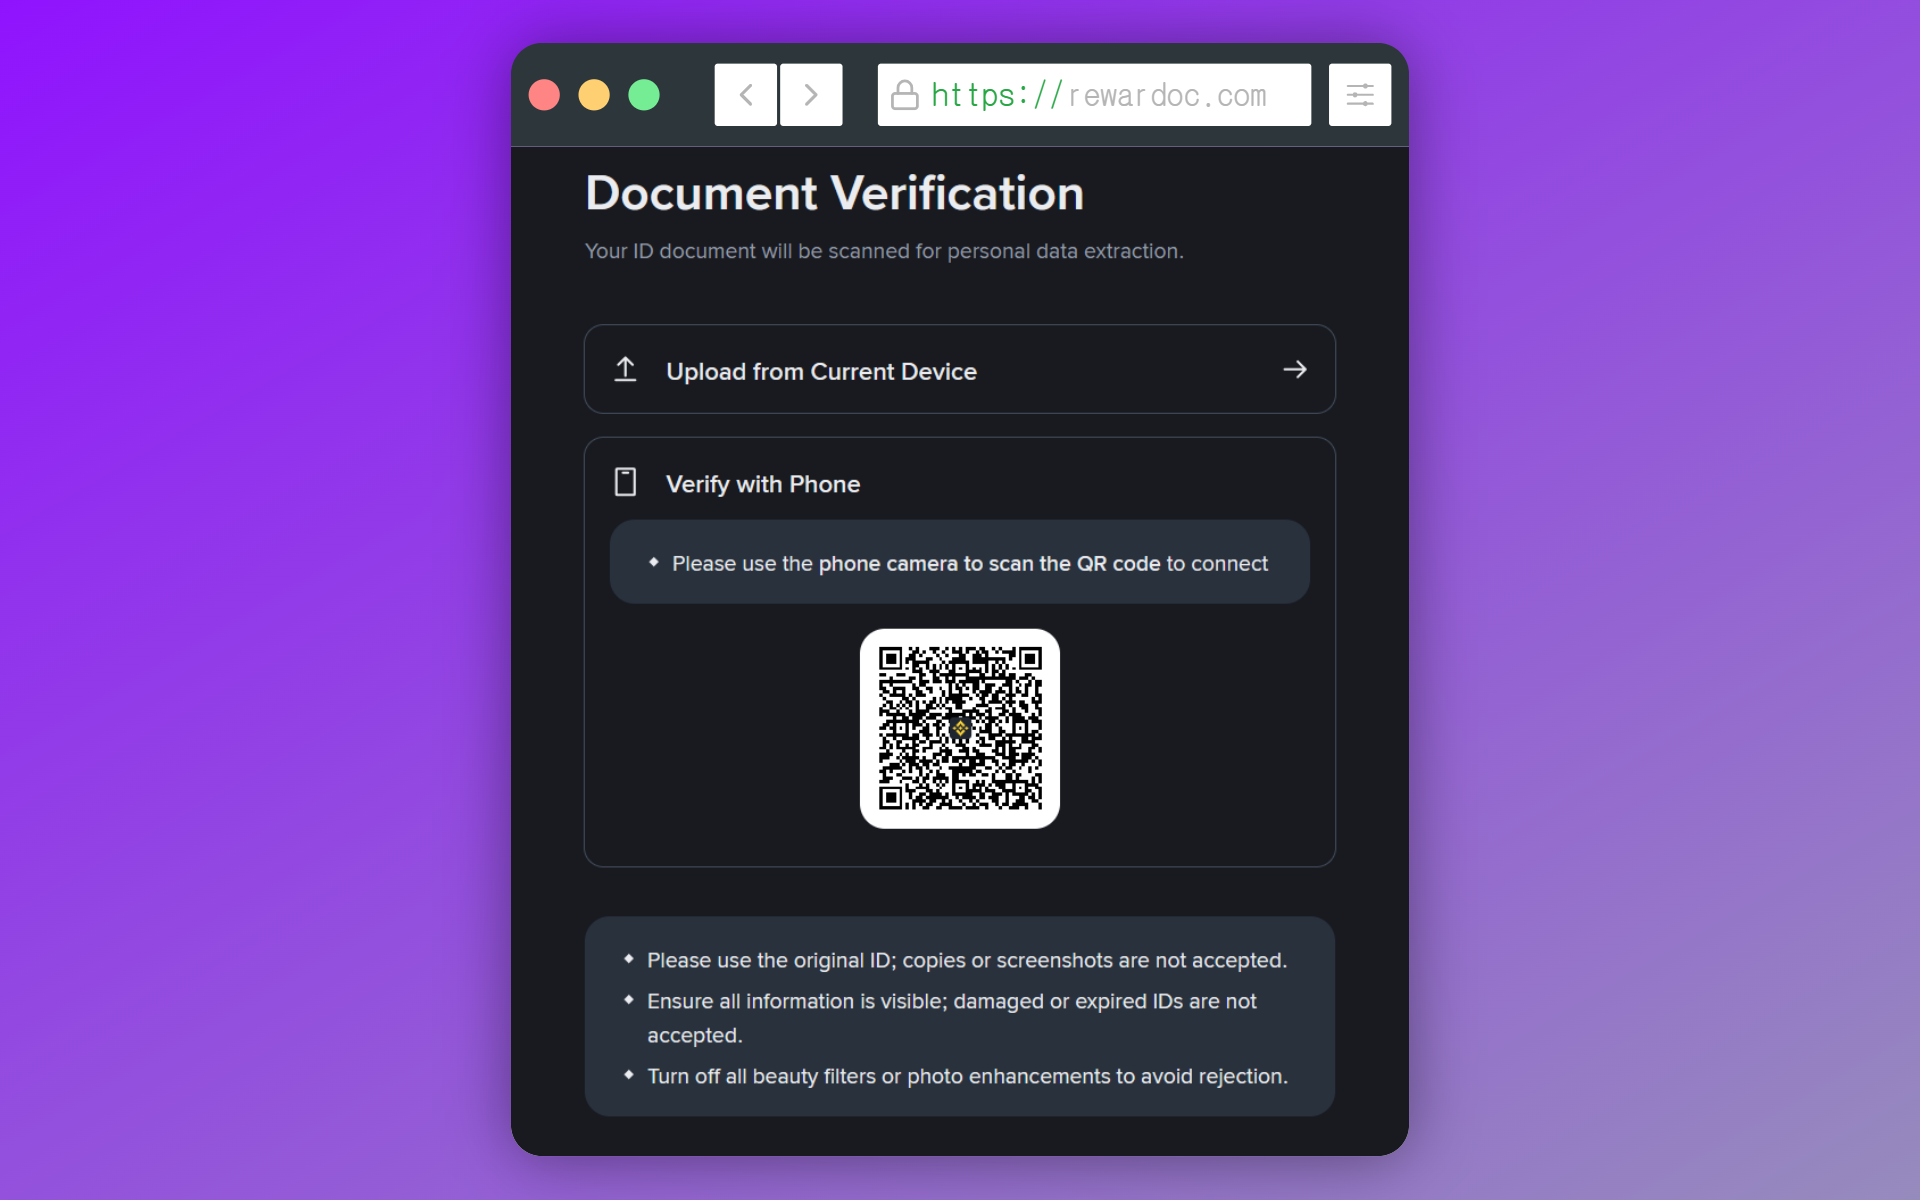
Doing KYC on desktop gives you two options: upload the ID photos from your computer, or scan a QR code and upload from your phone. Mobile works the same way.
Go with [Verify with Phone]. The [Upload from current device] option below it uses photos you've already taken, and those often have resolution or angle problems — resubmit enough times and you get bumped to manual review and wait over a day. A few rejections is all it takes (manual review can run hours or days).
Also, if you're doing KYC on desktop and scanning the QR to upload from your phone, both devices have to be on the same network. Desktop on ethernet, phone on Wi-Fi — that mismatch throws an error saying verification can't proceed. Put both on the same Wi-Fi. A lot of people burn several attempts before figuring this out.
Which is why you're generally better off doing the whole KYC flow on your phone, even if the ID photos are sitting on your computer. The face scan has to happen on mobile anyway.
2-6. Photographing the front and back of your ID
Fill the on-screen frame edge to edge with your ID. Glare gets you rejected instantly, so stay out from directly under a ceiling light, and lay the card on a dark surface for better contrast. Keep your fingers off the corners. Shoot the back the same way. Documents with no back side, like passports, skip this step.
2-7. Entering your name and date of birth
(Depending on your document type, this step may be skipped.)
Type your last name and first name exactly as printed on your passport. Dropping a middle name, or typing "Smyth" instead of "Smith," is enough to get a future transfer bounced. Fixing it at that point means going through support, which can take days. Five extra seconds now is a lot cheaper.
No passport? Copy the name exactly as it's registered on the exchange you'll be transferring from.
2-8. Entering your address
(Depending on your document type, this step may be skipped.)
Enter your address in Latin characters. Copying and pasting it from an official source is easiest.
If you're not sure of the correct format, look it up on your postal service's website — that gives you the standardized version. The form splits address line, city, and postal code into separate fields, so just keep the order straight.
2-9. The face scan
The front camera scans your face. Follow the prompts — turn your head side to side, blink when told. Take off hats and glasses, and don't sit with a light source behind you. Someone walking past in the background can fail it too. Move slowly; fast movement breaks the capture.
▣ Why face verification fails
Number one: weight change, so your face reads differently than your ID photo. Number two: hair that looks nothing like your ID photo — though testing this myself, a moderate difference was fine. Number three: makeup making your face read differently from the photo. Last one is simply an old ID, including cards old enough that the photo lamination has started peeling.
The common thread is a bad reference photo. If your ID is ancient, getting it reissued or switching to a different document might actually be the faster path.
2-10. Submitting and waiting
Once you submit, automated review kicks in. Best case it's done in minutes; get routed to manual and it drags. You can close the app — you'll get a notification on approval. Most people are through in under 15 minutes.
▣ If you get rejected
The rejection notice tells you which item failed. It's almost always photo quality. Check for glare, cropped corners, and fingers covering part of the card. If the name spelling doesn't match your ID, correct the field and resubmit.
Rejected three times or more? Leave it a day before trying again. Rapid-fire resubmissions push you from automated to manual review, which only makes the wait longer.
Account created and verified? Next up is setting up your OTP. Follow along here: [Setting up OTP on Binance].